
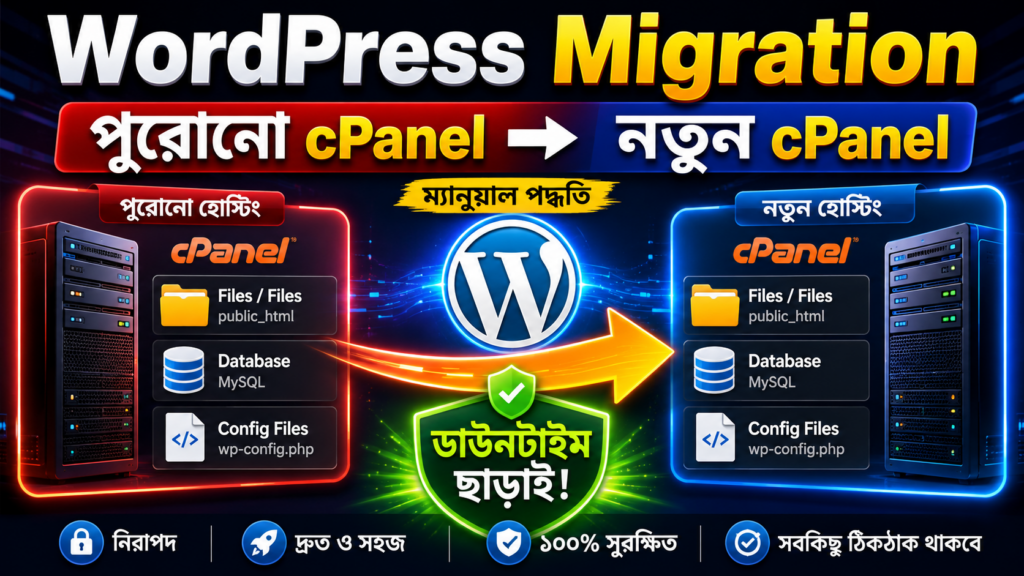
Is your web server slowing down during peak traffic hours? Or perhaps your existing web hosting renewal charges are getting way too expensive. Consequently, performing a manual WordPress website migration to a fast, secure new server host is the best technical decision you can make. Fortunately, you do not need premium or paid backup expansion plugins to execute this. In this comprehensive guide, we walk you through the entire cPanel to cPanel transfer process with zero downtime.
Step 1: Exporting Files for WordPress Website Migration
Initially, you must secure all raw deployment structures from your source legacy hosting environment account. This step guarantees complete asset retention before changing your network endpoints routing indicators lines.
First, open your web browser application and log into your source cPanel dashboard system. To do this easily, simply append your domain extension followed by /cpanel into the address bar URL fields. Fill in your active secure access credentials to access your control panel layers.
Next, find the system files management division section group and click directly onto the **File Manager** utility icon. Afterward, select the core root directory folder labeled public_html. This is where your live web application files permanently reside. Click the Select All feature button located inside the primary dashboard menu toolbar row.
Now, select the Compress operation option from the upper utility selection task bar. Choose the **ZIP Archive** format compression mode filter string. For clear identification, name your compressed file backup.zip. Finally, run the compression script routine. Once completed, highlight the generated file matrix and hit **Download** to save the package onto your local computer storage.
Step 2: Securing Databases for WordPress Website Migration
With your site core asset files downloaded safely, we must secure the matching background platform parameters. This means exporting your live tracking tables data environment before running the main domain mapping switch loop loops.
Locating Your Correct Database Name
If you host multiple applications inside an individual shared server instance, identifying the exact database for your WordPress website migration is critical. Fortunately, there is a simple structural validation trick to verify this profile matching parameter loop:
- Open your local
public_htmlconfiguration directories stack list view inside the file explorer window. - Locate the vital file platform definition script entry named wp-config.php.
- Right-click the entry and choose the View or Edit operations management utility line.
- Look through the printed line codes until you isolate the tracking macro configuration key labeled
DB_NAME(e.g.,xy_wp_cn1). Note this string down.
Running the Data Export via phpMyAdmin
Return to the main cPanel layout workspace and scroll to the database section group. Click on phpMyAdmin to load your data structure tables table mapping panel index grid.
Subsequently, expand the database structure line items hierarchy list panel on the left navigation console column. Click directly into the exact database target tag you extracted from your wp-config.php parameters block text field. Click the **Export** operation tab located in the main header section rows view matrix.
Keep the default settings active by selecting the **Quick** export method structure. Ensure the formatting output target parameter is locked onto the standard **SQL** format protocol string value. Finally, click the **Export** execution confirmation switch. The server will automatically download a clean copy of your database file.
Step 3: Deploying Assets on the Destination Server
Now that your core site assets are saved locally, we must mirror these elements inside your new destination host server infrastructure. This step is a vital phase of your manual WordPress website migration pipeline.


Initially, open your brand new web hosting provider dashboard management portal (such as SpaceShip). Subsequently, navigate through to access your new destination server account cPanel system grid controls.
Open the new **File Manager** module and jump directly inside the blank public_html target block validation folder. Click the **Upload** engine command switch button, select your local backup.zip container file, and transfer it. Once the monitor bar reaches full complete green status validation, click go back to return to the file paths tree rows panel.
Highlight the newly uploaded backup.zip package structure. Click the **Extract** processing command from the upper menu options toolbar index list. Confirm the target extraction zone is set exactly to the public_html path line and execute the script blocks extraction routine.
Step 4: Database Setup for WordPress Website Migration
With file assets successfully extracted across the new system space, we must set up a fresh repository matrix to hold our exported tracking tables layout components.
Running the MySQL Database Wizard
Go back to the destination cPanel home dashboard. Under the databases section, click on the **MySQL Database Wizard** option to build a fresh credentials database profile loop:
- Create Database: Enter a clean database identifier tag name string into the setup box field (e.g.,
wp) and select Next. - Create Database User: Provide a matching user identification tag name inside the user line field (e.g.,
wpuser). Use the automated password generator utility tool to pull a secure encryption password string. Copy this string and save it to a notepad file. Click Create User. - Assign Privileges: Check the master box marker labeled **ALL PRIVILEGES** to link the user securely. Click Make Changes to save the configuration mapping.
Modifying Your wp-config.php Credentials
Open up your new public_html file tree inside the editor module window. Right-click the extracted wp-config.php script file and select Edit. Carefully update the old tracking variables with your newly generated destination credentials fields details:
- Update the
DB_NAMEfield string line with your new database name. - Update the
DB_USERfield string line with your new database user tag. - Update the
DB_PASSWORDfield string line with your copied secure encryption string.
Click Save Changes to map the updated configuration profile values into the live virtual core file structures.
Importing Your SQL Data Fields
Return to your destination cPanel homespace. Access the new phpMyAdmin dashboard utility console module page framework to complete this phase of your WordPress website migration.
Select your newly created blank database path string row entry from the left navigation stack list directory view. Click the **Import** tab choice from the top display options tab panel group layout. Click **Choose File** and link your downloaded source SQL database file. Finally, click the **Import** button. Within moments, your data entries are integrated.
Step 5: Updating Domain Nameservers (DNS Config)
Both files and data tables now safely reside inside the destination web space network. However, your custom domain name still references your legacy hosting server line network connections. We must shift points to point directly onto the new server architecture network endpoints line.
Initially, log into your central domain registry account manager dashboard portal. Open your target domain profile configurations and jump straight into the **Name Servers / DNS Management** tab properties controls.
Select the option to customize your entries manually. Type in the unique nameserver target lines provided by your new hosting provider (e.g., ns1.spaceshipnet.net and ns2.spaceshipnet.net). Finally, save the name server settings modifications panel. While complete propagation globally across network links can take up to 24-48 hours, local routing changes usually resolve seamlessly within just a few hours without causing any web downtime.
Conclusion & More Web Tutorials
You have successfully completed a full manual WordPress website migration pipeline across clean cPanel hosting framework spaces without dealing with premium script block plugins. This clean technical migration keeps your site light, uncorrupted, and perfectly synchronized.
If you want to learn more about hosting operations or virtual server infrastructure, check out our curated list of resources inside our TechTalk Tutorial Archive.
To view the full terminal screen workflow and manual cPanel operations executed step-by-step in real-time, click to stream the tutorial video reference link right below:
